MIDI
Chromatik features a robust MIDI implementation that allows for simple, real-time hands-on control and musical responsitivity.
Managing Devices
MIDI input devices show up in the MIDI INPUT section of the right-pane OSC · DMX · MIDI tab.
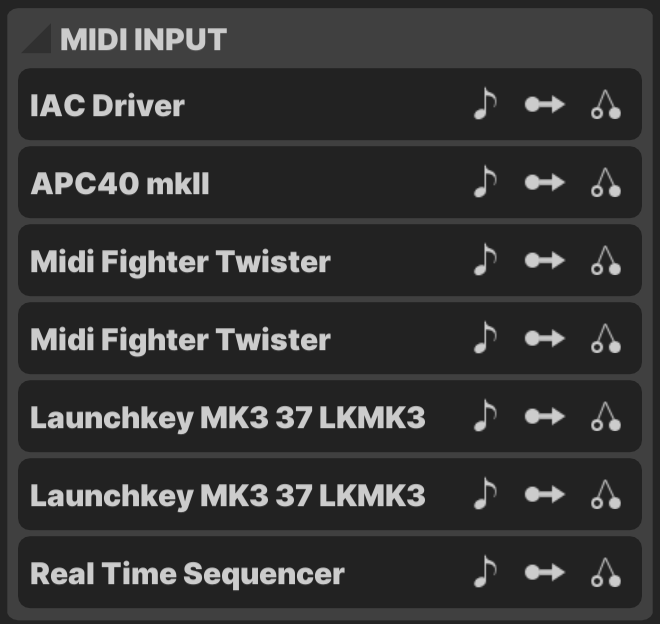
The device list is populated by the underlying operating system with device names provided by the driver. Each device has three toggles.
- Channel:
 Whether input from this device generates Channel Events
 - Control:
 Whether input from this device is used for MIDI Mapping
 - Sync:
 Whether MIDI Beat Clock received this device is used for Beat Clock Sync
Multiple Devices + Hot-Swapping
Note that MIDI devices do not have unique identifiers. Even the same physical device's name may vary across different OS and driver implementations. If you have two or more of the same device connected, the order may change depending upon which device was connected first or other OS settings.
Chromatik supports hot-swapping MIDI devices, if you disconnect and reconnect devices while the program is in operation, disconnected devices are grayed out in the UI until they are found again, while settings are maintained.
Channel Events
Channel Events are MIDI events that can be optionally handled by Pattern, Effect and Modulator devices. Devices which support MIDI display the note ![]() icon in their title bar, which can be clicked to configure a MIDI Event Filter.
icon in their title bar, which can be clicked to configure a MIDI Event Filter.
Devices may respond to the following MIDI events.
- Note On / Off
- Control Change
- Pitch Bend
- Channel Pressure (Aftertouch)
- Program Change
MIDI Event Filter
Channel Events can be filtered at the channel or device level. The filter for Channel is located in the Channel Strip. The filter for Pattern, Effect and Modulator devices is located in the title bar of the Device Controls. Click the MIDI note icon to open the MIDI filter.
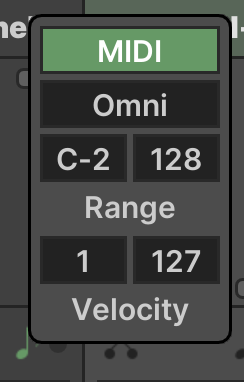
- MIDI: Whether MIDI is enabled on this channel or device
- MIDI Channel: MIDI channel to receive,
Omnifor all - Min Note: Lowest MIDI note to receive
- Note Range: Number of MIDI notes above minimum to receive (if
0all notes are ignored) - Min Velocity: Lowest MIDI note velocity to receive
- Velocity Range: Range of note velocities above minimum to receive (if
0all notes are ignored)
MIDI Mapping
MIDI Mapping allows you to create arbitrary mappings that link MIDI Note and Control Change messages with device parameters. This is managed in the MIDI MAPPINGS section of the right-pane OSC · DMX · MIDI tab.
To create a MIDI Mapping, one or more MIDI input devices must have the Control ![]() toggle enabled. Enter MIDI Mapping mode by clicking the Mapping
toggle enabled. Enter MIDI Mapping mode by clicking the Mapping  icon in the MIDI MAPPINGS section title bar or by pressing ⇧⌘M.
- All eligible control targets are highlighted in red
- Single-click on the parameter you wish to control
- Generate a MIDI Note or Control Change to create a mapping
- Repeat the process, or exit mapping mode by pressing ESC
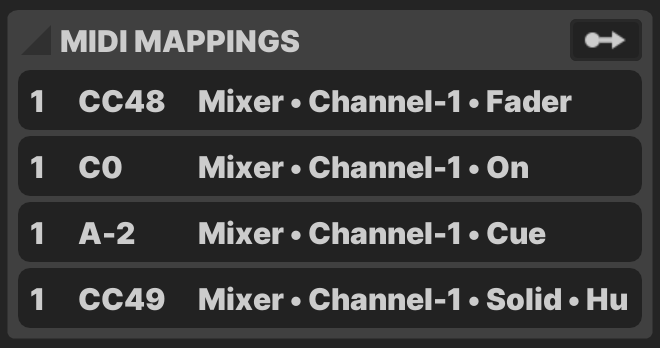
Mappings are shown in a list, displaying the Channel, Note or CC setting and the Target Parameter.
Remove a MAPPING from the list by pressing DELETE.
Changing MIDI Devices
Note that MIDI Mappings are not device specific. Any MIDI input device with the Control ![]() toggle activated that generates a matching MIDI event triggers the mapping. This allows you to swap out a different model of a MIDI keyboard or controller without having to re-configure all of your project's MIDI Mappings.
toggle activated that generates a matching MIDI event triggers the mapping. This allows you to swap out a different model of a MIDI keyboard or controller without having to re-configure all of your project's MIDI Mappings.
Beat Clock Sync
MIDI Beat Clock defines a set of MIDI messages that allow musical devices to synchronize based upon musical time, e.g. a tempo-based beat counter, rather than absolute timecode. Chromatik can be configured to listen for MIDI Beat Clock from an input device and sync to its tempo.
- Enable the Sync button for the MIDI device that is generating MIDI Beat Clock messages.
- In the Tempo segment of the Toolbar, select MIDI as the source in the Clock dropdown menu.
Whenever valid MIDI Beat Clock data is received, the BPM and beat counter update automatically, keeping Chromatik in sync with the MIDI device.
Control Surfaces
Chromatik includes support for certain hardware controllers to behave as a Control Surface, enabling dynamic control without any manual MIDI Mapping required. When eligible devices are connected, they are shown in the MIDI SURFACES section of the right-pane OSC · DMX · MIDI tab.
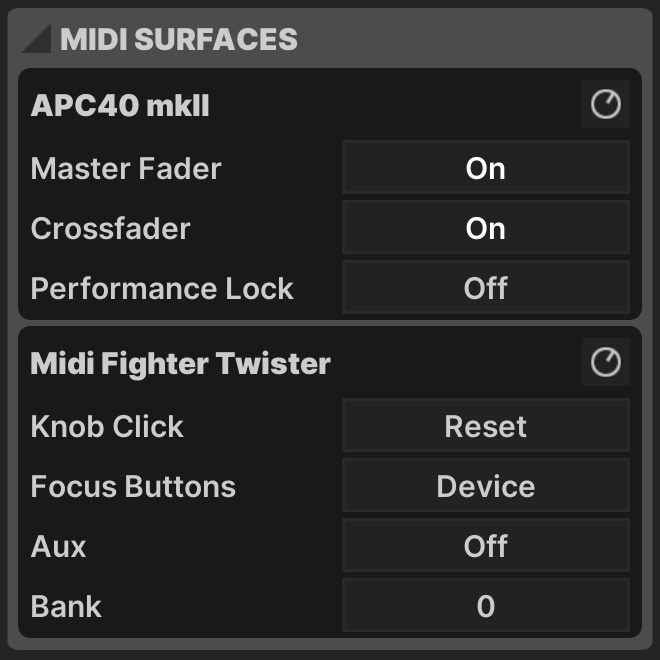
Enable a Control Surface using the Enabled ![]() button. Settings may be presented to customize the surface behavior.
button. Settings may be presented to customize the surface behavior.
Currently supported Control Surface devices include:
- Akai APC40 mkII — Unofficial Guide →
- Akai APCmini / APCmini mk2
- DJTT Midi Fighter Twister
- Pioneer DJM-A9
- Pioneer DJM-900NXS2
- Pioneer DJM-V10
Computer MIDI Keyboard
You can use the computer keyboard to generate MIDI Note events if you do not have a MIDI keyboard connected. Toggle the Computer MIDI Keyboard in the Settings Toolbar, or by pressing ⌘K.
Change keyboard Octave with Z + X and Velocity with C + V.
| Key | MIDI Note |
|---|---|
| A | C |
| W | C♯ |
| S | D |
| E | D♯ |
| D | E |
| F | F |
| T | F♯ |
| G | G |
| Y | G♯ |
| H | A |
| U | A♯ |
| J | B |
| K | C |
| O | C♯ |
| L | D |