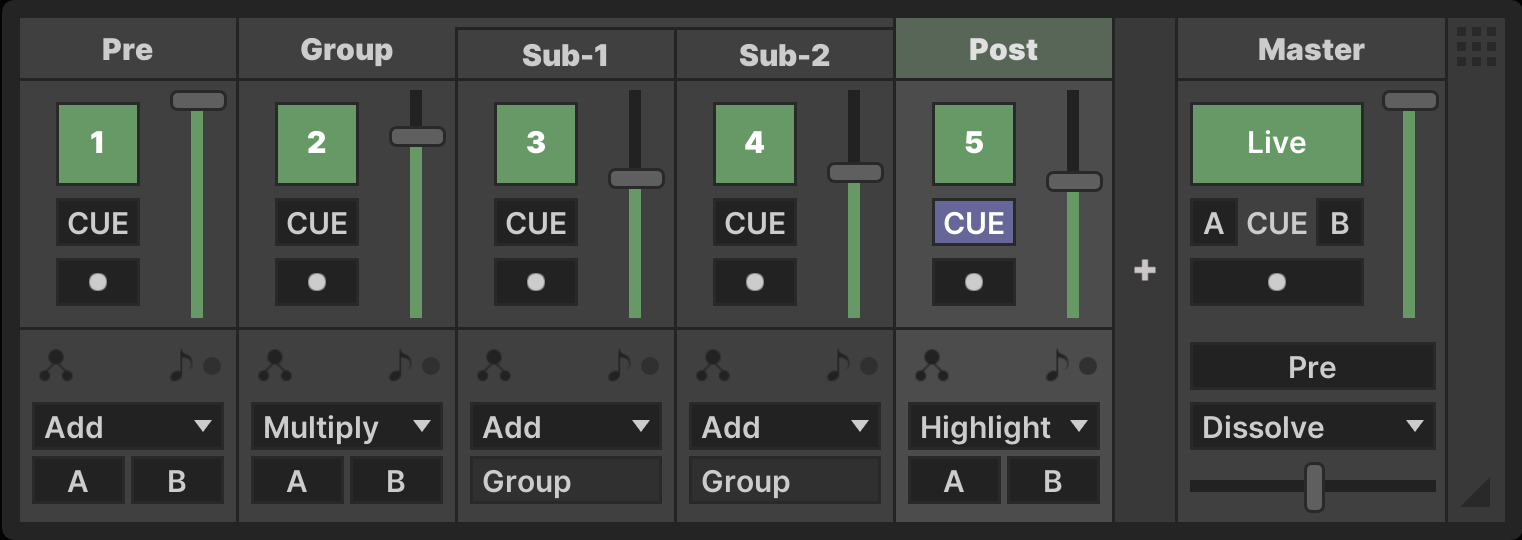
Mixer
The Mixer is a streamlined interface for compositing multiple animation sources into a single output, modeled after the design and function of a DJ mixer. On each pass of the core animation loop, the mixer processes all channels and blends them from left-to-right. The mixer houses a dynamic number of channels and groups with one fixed Master channel at the end.
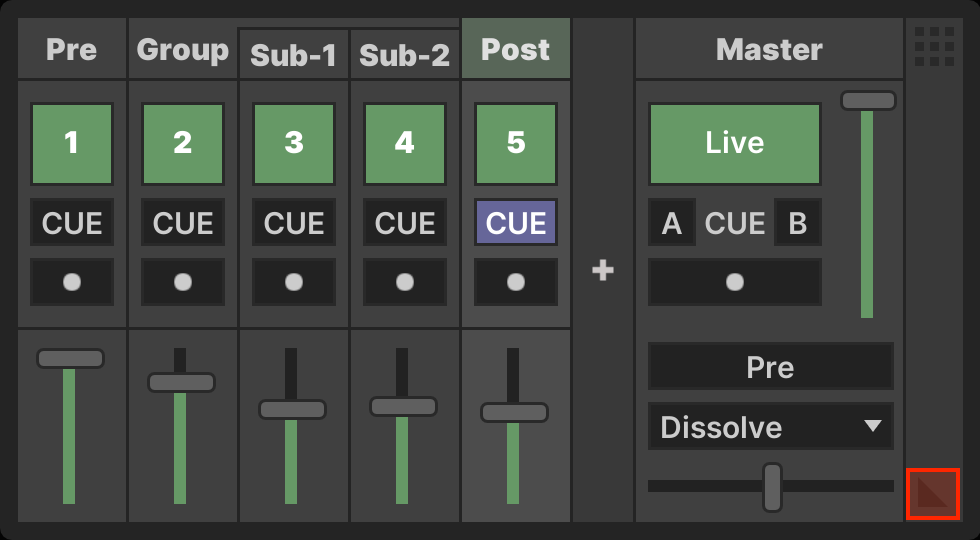
Condensed View
When working with a large number of channels, a condensed view of the mixer may be toggled by clicking the triangle icon in the bottom right corner or pressing ⇧<.
Channels
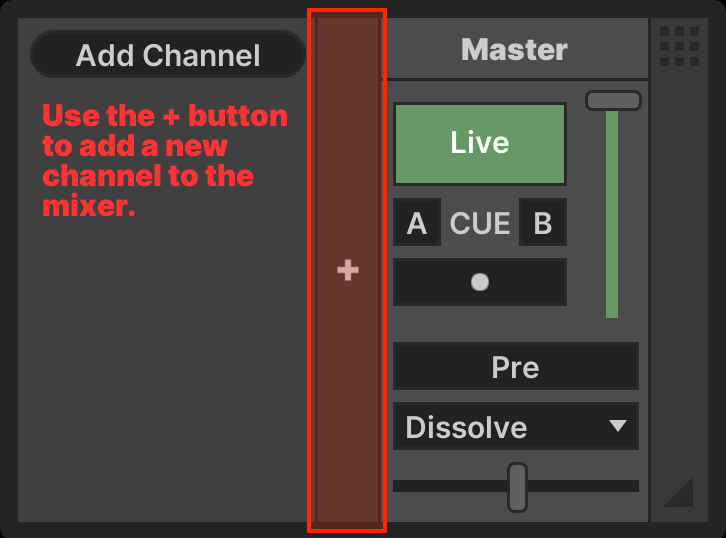
Add a Channel
Add a channel using the strip to the right of the last mixer channel or by pressing ⌘N when the mixer has keyboard focus.
Rename a Channel
Rename a channel by pressing ⌘R when the channel has focus, or by pressing RETURN when the channel's label bar has focus.
Reorder Channels
Channels may be reordered with drag-and-drop, or by pressing ⌘← + ⌘→ when a channel has focus.
Duplicate a Channel
Duplicate a channel, including all its devices, by pressing ⌘D when a channel has focus.
Delete a Channel
Delete a channel by pressing DELETE when a channel has focus.
Focus + Selection
At any time a single channel has focus. The entire Channel Strip for the focused channel is highlighted, and its devices are shown in the Device Bin to the right of the mixer. The focused channel is selected automatically.
Modifier keys can be held while clicking to select multiple channels ⌘ or a range of channels ⇧. Range selection can also be performed with ⇧← + ⇧→. The DELETE and grouping operations make use of multiple-selection.
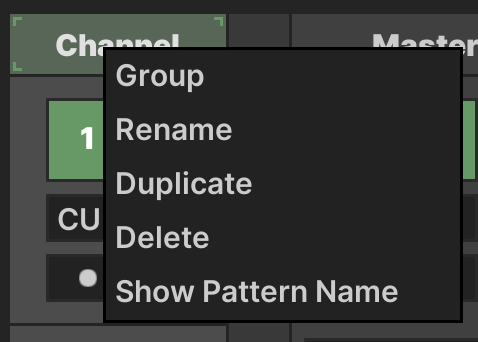
Context Menu
Right-click on the channel header to show a context menu with channel actions and the ability to toggle display of the Channel label or the active Pattern label.
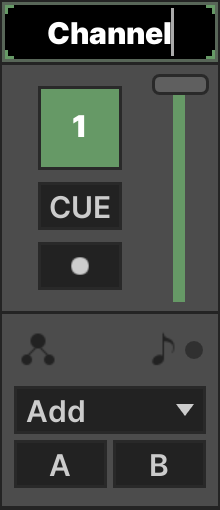
Channel Strip
The Channel Strip contains all the channel controls.
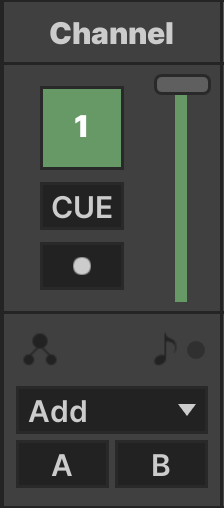
- Enabled: Whether the channel is active
- Fader: Degree to which this channel is blended
- Cue: Show just this channel in the Preview Window (see Cueing)
- Arm: Whether this channel is armed for automation recording
- View:
 Optionally selects a sub-view of the model for this channel (see Views →)
 - MIDI Filter:
 Configures how MIDI events are routed to this channel
 - Blend Mode: Specifies what type of compositing this channel uses
- Crossfader Assignment: + buttons assign this channel to a crossfader
Note that if a channel's fader is set to 0, the channel's animation routines are still run as long as the Enabled toggle is on. However, no blending computation is performed when the fader is at 0.
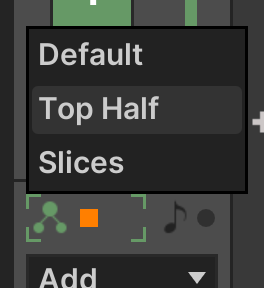
View Selector
By default, all channels animate against the entire Model. However, individual channels and devices may be configured to animate a particular view (see Views →). Select this option at channel scope by clicking the view selector to open a drop-menu with all available views. When activated, the view icon is activated and a small square is displayed to quickly indicate the active view by its representative color.
MIDI Filter
Channels and the devices they contain may receive MIDI events from connected input devices. This can be activated and filtered at a channel level by using the MIDI filter. Click the MIDI note icon to open the MIDI filter.
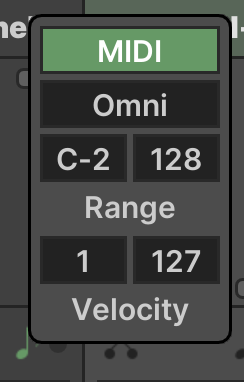
- MIDI: Whether MIDI is enabled on this channel
- MIDI Channel: MIDI channel to receive,
Omnifor all - Min Note: Lowest MIDI note to receive
- Note Range: Number of MIDI notes above minimum to receive (if
0all notes are ignored) - Min Velocity: Lowest MIDI note velocity to receive
- Velocity Range: Range of note velocities above minimum to receive (if
0all notes are ignored)
Groups

Channels may be combined into groups that function like a submix. Channels in the group are composited together from left-to-right, and the group is then treated as a single channel for compositing at the top-level, with its own Blend Mode.
Channels within a group may not be assigned to a crossfader group, but the group itself may be. The crossfader assignment buttons for channels within a group are replaced with an uneditable box indicating the group.
Groups may not contain other groups, only one level of nesting is supported.
Create a Group
Select multiple channels, and create a group by pressing ⌘G or by using the right-click context menu on a channel header.
Add a Channel to an Existing Group
Add a channel to an existing group using drag-and-drop.
Ungrouping Channels
To remove a single channel from a group, either drag-and-drop it out of the group or press ⌘G while the channel has focus.
To ungroup all channels from a group, press ⌘G while the group channel has focus. The group channel is deleted and the contained channels become normal channels.
Delete a Group
Press DELETE to delete a group and all of its channels.
Master
The Master channel is a special channel that processes the composited output of all the normal channels and groups before the output stage. It cannot be renamed and has some distinct controls.
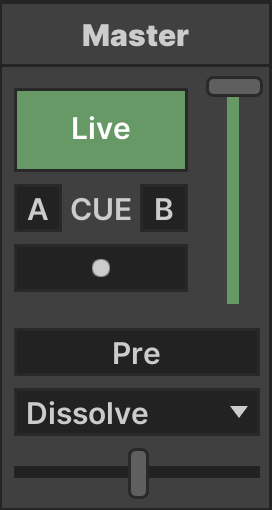
- Live: Whether real network output is sent
- Fader: Controls master output level, which may also impact the Preview Window
- Crossfader Cue: Buttons to preview the A or B crossfader side only (see Cueing)
- Arm: Whether this channel is armed for automation recording
- Preview Mode: Whether Preview Window rendering is
Pre/Postthe master fader - Crossfader Blend: How to composite the A and B crossfader groups
- Crossfader: Blends between the A and B crossfader groups
Preview Mode
When working with very bright lighting fixtures, it is often desirable to dim the hardware output while maintaining a full-brightness simulation on the Preview Window. If Preview Mode is set to Pre, the Preview Window shows a full-brightness rendering, before the Master Fader is applied. When set to Post, the Preview Window shows a reduced-brightness rendering, taking the Master Fader level into account.
Cueing
By default, the preview window renders the full model using the output colors of the Master channel. However, the Cue feature on each individual Channel or the Master channel Crossfader Cue setting may be used to tell the Preview Window to show something different than the master output. This is similar to the Cue function on a typical DJ mixer, which enables a DJ to preview an audio channel via headphones without impacting what the audience hears.
Multiple channels may be cued in combination by holding the ⌘ modifier key while clicking. Individual channel cues may not be used in combination with the Crossfader Cue buttons on the Master channel. When a Crossfader Cue is enabled it shows a preview of the fully composited result of the specified crossfader bus.
Crossfading
By default, the Mixer renders and composites channels from left-to-right. However, individual channels or groups may be assigned to an A or B crossfader bus. Channels assigned to each of these buses are composited separately, resulting in three final submixes: Standard, A, and B.
The Master channel combines all three of these submixes by blending A and B using the compositing method specified in the Crossfader Blend setting. This result is then added to the Standard output.
Standard _____
              \
               \
Submix A _      ⊕-> Master
          \    /
           ⊗ _/
Submix B _/
Blend Modes
Numerous compositing algorithms are available to channel faders as well as the crossfader. Wherever possible, the names of these modes are consistent with labels found in industry-standard graphics applications, e.g. Photoshop. Chromatik supports alpha transparency and it is respected by all of these blend modes.
Wikipedia has a good primer page on Blend Modes.
Add
Adds the R, G, B components, producing an equal or brighter result which appears as the superposition of both images at once (with possible clipping subject to the maximum brightness).
Multiply
Multiplies the R, G, B components. When one image is all white, the result is the same as the second image. Otherwise, the result is strictly darker and functions like a masking of the two images, with light appearing only on points in which both contain light.
Subtract
Subtracts the R, G, B components of the second image from the first, producing an equal or darker result. The primary image becomes darker wherever there is light in the second image. Subtracting black does nothing, whereas subtracting full white erases any image entirely.
Difference
Computes the absolute difference between the R, G, B components and takes the positive value in all cases. Difference with black does nothing, whereas difference with full white inverts the image.
Normal / Dissolve
Normal blending mode is a standard replacement, with each R, G, B component in the second image replacing the first, subject to alpha transparency (which is treated linearly). In the Crossfader this is called Dissolve, and uses a modified alpha handling such that the central point on the crossfader shows a mix of both images.
Dodge / Burn
See Dodge and Burn on Wikipedia →
Highlight
Takes the result of multiplying the two images and adds it to the first image. The result always contains the same color profile as the first image, but may become brighter. Think of this as additional light being shined from behind a curtain, raising the intensity in areas where the color of the light matches the curtain. Black areas always remain black.
Spotlight
Computes an all-white color based upon the brightness of the second image, multiplies the first image by this white level and adds it to the first image. Think of this as a spotlight being shown onto the front of a reflective curtain. The image on the curtain becomes brighter and also more white in its brightest areas. Black areas always remain black.
Lightest
Takes the lightest of each R, G, B component, always producing an equal or lighter result.
Darkest
Takes the darkest of each R, G, B component, always producing an equal or darker result.